|
For a feature overview and introduction, please see  https://www.uplinx.com/phonecontrol/erase-ctl-itl-files-from-cisco-phones/. https://www.uplinx.com/phonecontrol/erase-ctl-itl-files-from-cisco-phones/.
The Bulk Erase Wizard of the Uplinx Phone Control Tool enables you to quickly and easily:
1.Erase 'All Settings'
2.Erase only the 'Security Settings' (CTL/ITL files)
... from phones remotely; though phones must be registered with CUCM. This is an operation that can normally only be performed on phones manually.
Having the wrong CTL/ITL files installed on phones can lead to major issues during an upgrade or migration, because the phones will not trust the TFTP server and hence not update the configuration. This will stop any changes to the phone's configuration being activated on the phone.
Normally the Erase function can only be executed manually on each phone, so if there are hundreds or even thousands of phones this might take some time. At one minute per phone, if there are 500 phones, it may take around 8 hours to perform this procedure manually.
The following 2 scenarios are supported:
1.Erase 'All Settings' or 'Security Settings' on phones on a same CUCM cluster.
2.Erase 'All Settings' or 'Security Settings' to migrate phones to a new CUCM cluster
This requires that the phones be correctly registered on the initial CUCM cluster, that the DHCP server be properly prepared and then the Erase function is executed. You must read How to migrate Cisco phones to new CUCM servers as the right migration steps must be followed to be successful.
Both scenarios are fully supported in the wizard, which will guide you and will verify, in the last step, that phones have either re-registered on the same cluster, or have been migrated successfully to a new cluster. However, to migrate phones successfully to a new cluster, you must fully understand the steps to be performed as outlined in How to migrate Cisco phones to new CUCM servers.
|

|
Bulk Erase is only possible when the phones are registered to a CUCM server. Once phones are no longer registered to a CUCM or have lost JTAPI control, erasing CTL/ITL files is not possible. In this case, each phone needs to be visited and the CTL/ITL file needs to be manually erased at the phone.
|
|

|
This feature requires a Professional or Enterprise license. Demo license users may evaluate this feature by processing no more than 3 phones at a time.
|
Before using Bulk Erase, make sure that you have performed the initial configuration Setting up Remote Phone Control Tool and have executed the 'Test All'. The GUI mode guides the user with a wizard in the following steps:
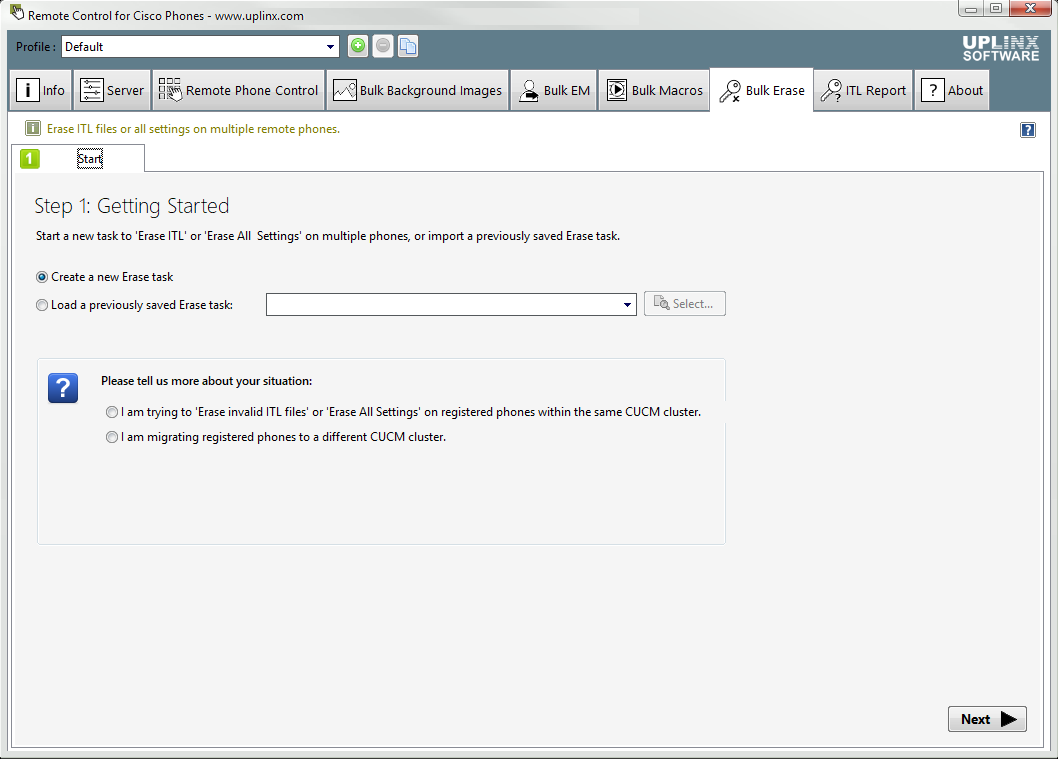
Step 1 . Getting Started
Get started with a previously saved Bulk Erase configuration (created in Step 3), or create one from scratch. Choose one of the following tasks:
0.Erase CTL/ITL on the same cluster.
1.Migrate phones from an existing cluster (which the phones are currently registered to) to a new cluster.
|
|
If you select "I am migrating registered phones to a different CUCM cluster", make sure you know the entire migration process from the section above and understand that erasing the ITL files does not automatically migrate the phones. You must read How to migrate Cisco phones to new CUCM servers as the right migration steps must be followed to be successful.
|
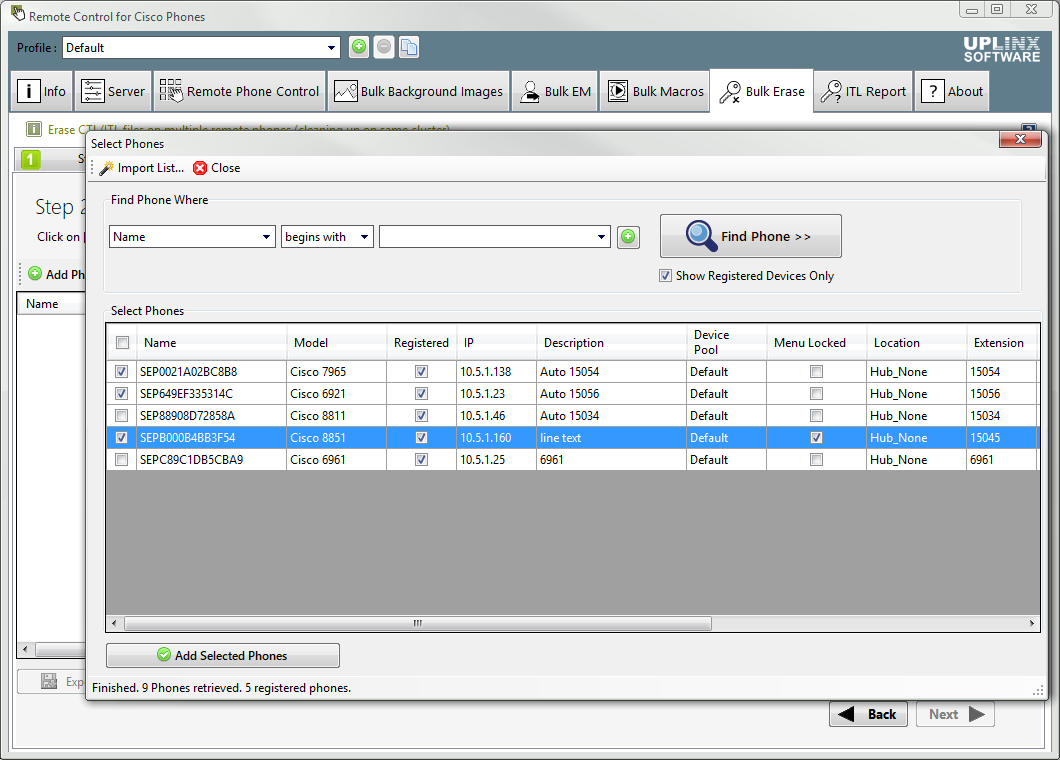
Step 2 . Select Phones
Use the [Add Phones...] button to add selected phones using given search criteria to the selected phones list. This can be performed multiple times to build a list of phones with different search criteria.
|
|
We strongly recommend starting with small amounts of phones and then increasing the amount if all goes well. You should never add more than 500 phones to one task. Phones can be filtered by device pool, model, location, description and extension to break the list down into chunks.
|
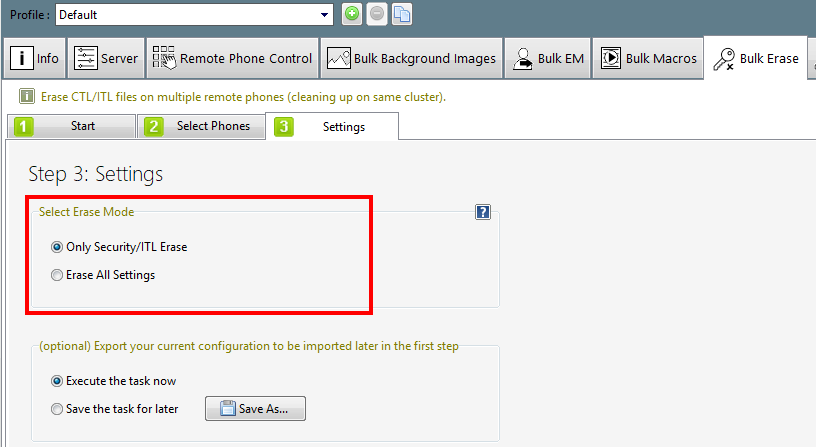
Step 3. Settings
On this step you can define settings:
•Select Erase Mode
oOnly Security/ITL Erase.
oErase All Settings. We recommend this setting unless there are user specific settings such as background images and ring-tone settings. Please see How to select Erase Mode.
•Save the Erase task to run at a later time or execute the task now. Saved tasks can be loaded at a later time in Step 1.
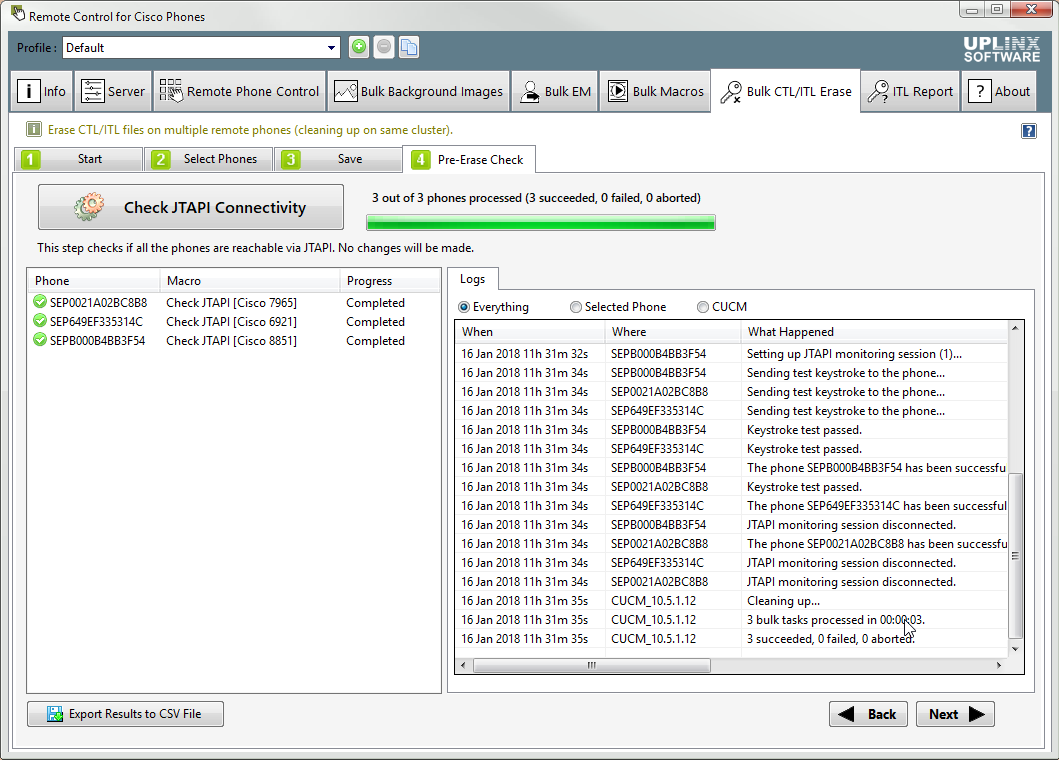
Step 4. Pre-Erase Checks
The Bulk Erase uses JTAPI to send keystrokes from Phone Control Tool to the phones. Therefore, JTAPI access must be enabled on the phones. This means the phones must be registered to the CUCM cluster and the CTI Manager service must be running on the CUCM server that the phone has registered to. Please consult Cisco documentation to ensure phones can be controlled by JTAPI.
Once the JTAPI reachability of the selected phones has been checked, the Erase Wizard will move on to the 'Erase Step'.
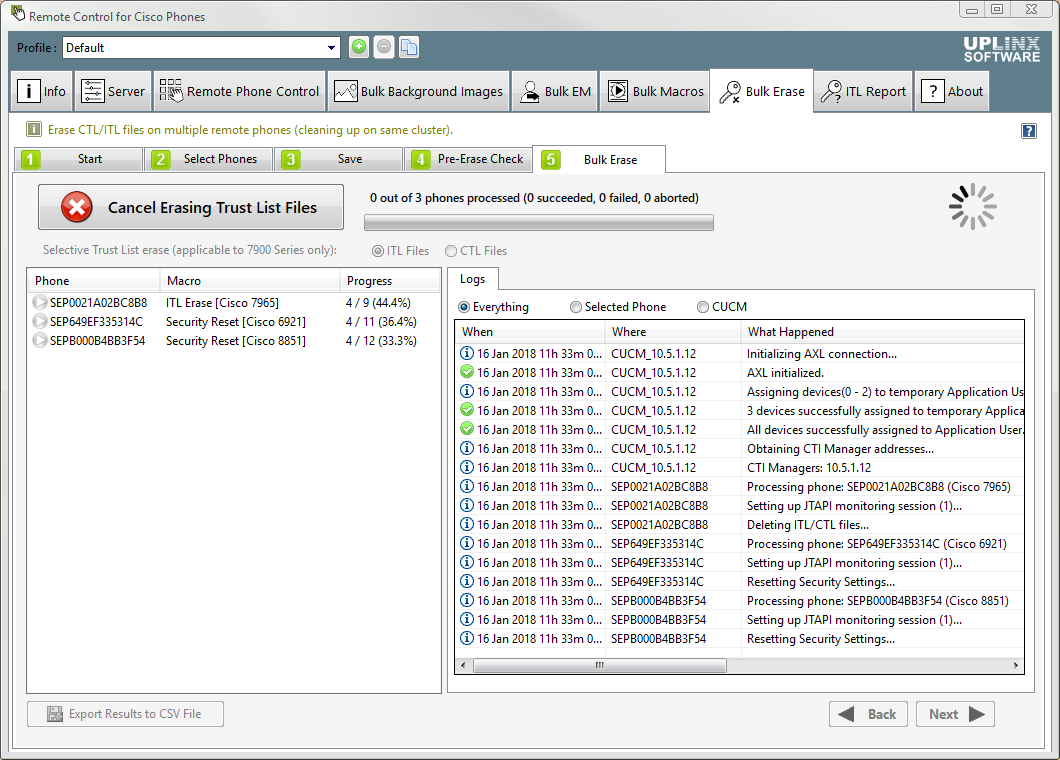
Step 5. Erase Step
Simply press the "Erase Trust List" button to begin the Bulk Erase process. Phones will be processed concurrently and it may take 20 seconds to 2 minutes to process each phone depending on its model. All the phones will be hard-rebooted once the CTL/ITL file has been deleted.
|
|
Bulk Erase is only possible when the phones are still registered to the CUCM server configured in the Remote Phone Control Tool. After the erase operation, phones will be automatically reset and re-register to the CUCM server listed in the DHCP option. If you are in a migration process, it is crucial to point the phones to the CUCM server you wish to migrate to (typically configured via DHCP option 150) BEFORE initiating the erase process.
|
|
|
Selecting the "Erase CTL" and "Erase ITL" will only make a difference on 7900 Series phones. On all later phone models, this operation will simple erase the Security Settings regardless of this selection.
|
|
|
If the Administrator Settings menus on the phones are password-locked (refer to Understanding Administrative Passwords ), the ITL Erase will try to enter the password remotely to unlock them. However this is currently not supported on the following models: all 6900 Series, 8941, 8945, 8961, 9951, 9971.
|
Step 6. Verification
This step will verify the registration status of the selected phones and check it is registered on CUCM. You can use this step to identify which phones have run into a problem and were not successfully migrated to the new destination cluster, or where the Erase process was not successful. You can then try re-running the Erase preocess, or if the phones do not re-register to CUCM you must visit these phones to manually factory default each of them.
Depending on whether you migrate phones to a new cluster or erase settings on an existing CUCM, this verification means:
•Same CUCM: Phones have registered back to the same CUCM cluster as before executing the Erase.
•Phones migrating to new CUCM: phones are now registered on the destination CUCM cluster (as directed by the DHCP option 150) after the settings of the previous CUCM have been erased. In the migration case, the IP address and AXL login info of the destination CUCM cluster needs to be provided.
After erasing phone settings, wait at least 10 minutes before running the verification step as the phones may take a long time to fetch a DHCP address, re-register and may reboot multiple times to download and apply phone images - in particular if you migrate to another CUCM version that has different phone images. If you have a large deployment or low bandwidth, you may want to wait even longer. If you run the verification steps before the selected phones have completed all their steps, these phones will show as failed. Hence, before running the verification step, wait to make sure the selected phones have completed all steps.
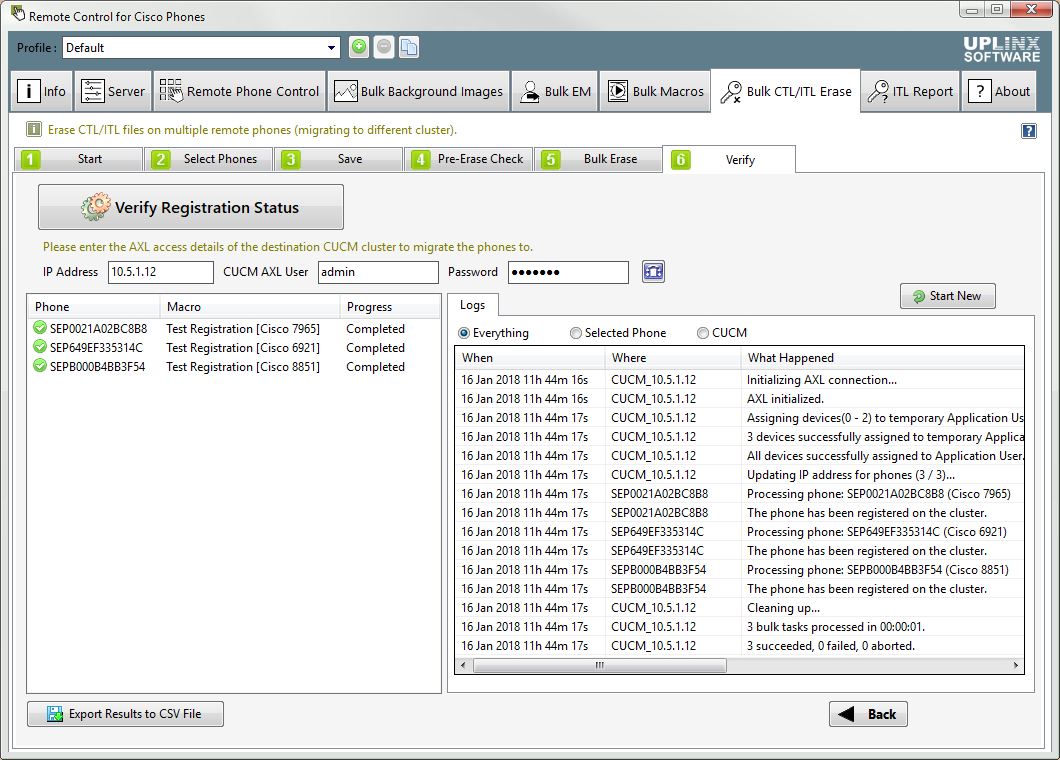
Alternatively, the result can be verified by generating an ITL Status Report or ultimately by directly looking at the phone.
|