|
How to migrate Cisco phones to a new CUCM servers in a few steps - by using CTL/ITL Erase
When you migrate your existing Cisco UC system, where all the phones are to be registered to a newly installed Cisco CUCM cluster, there are some important steps to consider. UPLINX Phone Control can help you in this process. The following migration steps are very important for a successful migration.
|

|
We strongly recommend that you thoroughly test the proposed migration steps with one test phone of each Cisco model that you are using before applying it to large numbers of phones. Nothing is more embarassing than spending days walking the floors of your organization to manually default each phone or to manually erase the CTL on each phone.
|
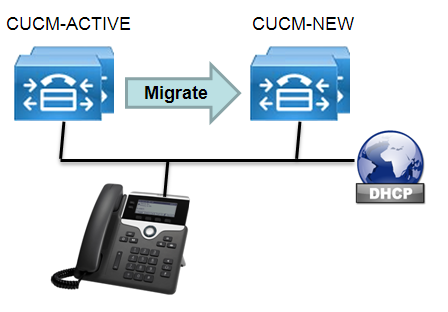
We outline a typical migration scenario where phones should be migrated from the currently active CUCM cluster, for this example called CUCM-ACTIVE, to the new server setup called CUCM-NEW. Also involved is the DHCP Server, which you need to re-configure to change the DHCP option 150 for the DHCP pool of the phones to be migrated, to point to the IP address of CUCM-NEW.
Here are the steps to follow for a successful migration:
1.) Make sure that:
•Your phones are registered with CUCM-ACTIVE and have valid ITL files.
•Make sure that all phones have access to a CTI Manager service running on the CUCM server where the phone registers to.
•Sort out any inconsistencies.
•If you use administrative passwords within the Common Phone Profile, remove the administrative passwords before the migration.
•For 79xx phones only, reboot (called Reset on CUCM Administration) all 79xx phones to achieve that the phones are locked (i.e. show the Lock icon when you press the Settings button). This is very important as Phone Control Tool will send the unlock sequence.
2.) Re-configure the DHCP server to set "Option 150" with the IP address of CUCM-NEW.
3.) Run the Bulk Erase wizard in UPLINX Phone Control from your desk when connected to the LAN. Do not use VPN as you really do not want to get this step interrupted. The bulk wizard allows grouping of phones by filtering by device pool, extension range and models. Use a single phone to test the procedure first.
4.) The phones will automatically reboot when the CTL/ITL erase key sequence has been executed. During the boot, the phone will fetch the new DHCP settings and register to the new CUCM server and then immediately download the new ITL file to flash. The phone will then download the phone firmware image if it has been changed and may reboot multiple times.
5.) Wait up to 10 minutes until all phones have re-registered.
6.) Run the verification step to identify those phones that do not re-register on the new CUCM cluster.
7.) Reboot all phones in CUCM Administration > Phones. Select all phones > Reset. This will lock the phones. After re-registering, the phones are unlocked, so rebooting will lock them. It will also return the phone to the main screen.
8.) Re-apply the administrative passwords within the phone profiles if you have removed them before the migration.
:-) Pat yourself on the back and grab a coffee! The migration is done.
If things don't go smoothly - here are some hints
1.) To erase the CTL files with UPLINX Phone Control, the phones MUST be registered currently to the initial CUCM server and have a valid ITL file. If this is not the case and the previous server is not available, no remote phone control is possible. In this case, try to restore the previous server from backup and get the phones registered. Then follow the above steps for the migration.
2.) If phones do not re-register after trying many things ... Unfortunately, you are out of luck at this stage. If the phones do not re-register to the intial server, or to the new server, there is no way out and these phones need to be visited and settings erased or factory defaulted.
Related reading:
•Understanding ITL Files
•Why is my Cisco phone so stubborn and does not apply config settings?
•Report on phones with invalid ITL files
|