|
This chapter is a quick step-by-step guide to building a basic but very useful reporting system. Sample script code is provided in <Report Tool installation folder>\webreport.bat. This script implements the following features:
•Generates (nightly) CUCM configuration reports and Phone Inventory reports based on a schedule.
•Publishes reports to a web server.
•Processes the reports by generating a comparison report and publishing to web.
•Sends a notification email if something fails.
•Sends a notification email if a configuration item changes. For example, send the changes applied to CSS and partitions (only) if there were changes to a CUCM admin for review. This functionality is outlined in the next chapter Example 6 - Automatically Monitor CUCM Configuration Changes and Trigger Alert Emails.
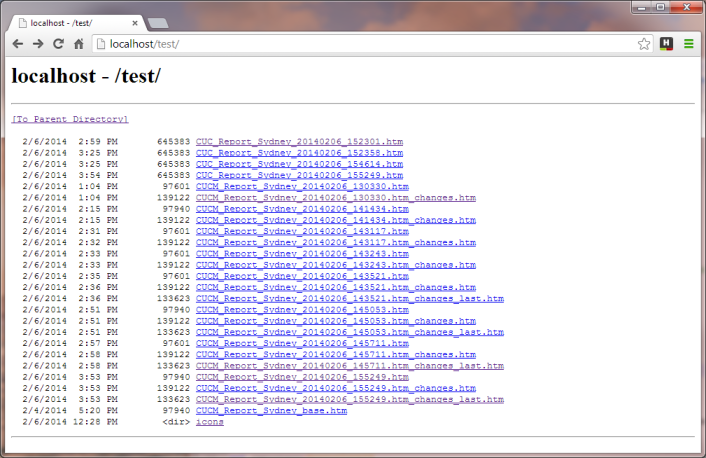
After this script has run several times, the published files on the web page will look as follows and the report can be opened by selecting a report:
Sample script code is provided in <Report Tool installation folder>\scripts\webreport.bat – so you can quickly build a custom web reporting front end to leverage the capabilities of Report Tool further. Since it is a script, you can also fully customize it to your needs by modifying the script code. This script is a simple windows BAT file and is already deployed in the Report Tool folder by the installer (by default) to 'C:\Program Files\UPLINX Report Tool\scripts\webreport.bat'.
The script can be run from Windows Command Prompt and also by the Windows Task Scheduler to automatically generate reports at scheduled times. To generate a scheduled report, configure a new task to run this script by the Windows Task Scheduler. Perform the following steps to create and publish reports:
1.Setup Report Tool in GUI mode.
2.Create a script file (BAT) or modify the provided 'webreport.bat' script file to suit your needs. The script should contain correct ReportTool.exe command line parameters and the logic you wish to execute (for example, generating a CUCM or CUC config report and publishing it to a web server). Before scheduling it with Windows Task scheduler, make sure it is running correctly from the command line by starting the script from a CMD prompt. If you are using the provided 'webreport.bat' script, the script can be run by typing 'webreport.bat' on a CMD or PowerShell prompt.
3.Install and configure IIS.
4.Create an entry in the Windows Task Scheduler to execute the script at scheduled times.
Step 1: Setup Report Tool in GUI Mode
Start Report Tool and configure:
•MUST DO: No timestamp option in profile (Start GUI, tick 'No timestamp', close application).
•Disable Word, CHM, Excel generation unless required.
•Select some configuration objects in the configuration tree in Report Tool > Report Generation tab > small silver cog > select CUCM version tree > select items to be included. Only items which are presend in the base and changed report will be compared.
After closing Report Tool, these settings will be stored in the default profile, and the default profile settings will be used when Report Tool is run from the command line without the /config option. Alternatively, you can create a specific profile in GUI mode to use its settings by calling ReportTool.exe /config "myprofile".
Step 2: Create the Script File
A sample script is provided in the file webreport.bat. It is a simple windows BAT file and is already deployed in the Report Tool folder (by default: 'C:\Program Files\UPLINX Report Tool\scripts\webreport.bat'). It needs to be modified to your needs. Please note the comments which explain the steps and any modifications required:
•Set the details of your mail server.
•Set the CUCM IP address, user and password. If the CUCM IP is empty – no report will be generated.
•Set the CUC IP address, user and password. If the CUC IP is empty – no report will be generated.
•Create the directory C:\mytemp\reports or modify the outpath.
•Setup IIS for the directory C:\inetpub\wwwroot\test or modify webroot in the script.
•Set reporttitle to the name of the location, such as Sydney.
•Replace the comparison to your base golden image in the line set basereport=C:\inetpub\wwwroot\test\CUCM_Report_Sydney_base.htm. You can also remove this section so that the comparison only contains the changes of the last 24 hours i.e. compare the current report to the last report (assuming report is scheduled nightly).
Step 3: Download and install an SMTP Mailer
Use a Windows Command Line SMTP Mailer such as blat. You can also use any other mailer – in that case you have to modify the script accordingly. Use the 32-bit program files and copy all files to the UPLINX Report Tool folder and any path which is part of your %PATH%.
Step 4: Install and Configure IIS
The Windows Task Scheduler can be started in Start > Control Panel > Programs and Features > Turn Windows Features on or off. Make sure to enable Directory Browsing and Static content.
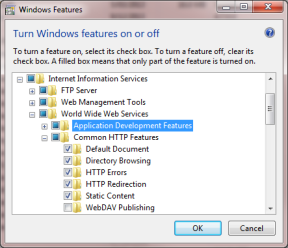
You should now see the standard IIS welcome screen when browsing to http://localhost.
Further customize IIS by creating a virtual directory or enabling authentication. Make sure to hide files that should not appear in the web browser. For example, right click on the file 'web.config' > Properties > Enable hidden in your published folder .
There are plenty of guides on how to enable authentication per user on the web, so this is not outlined here.
|
.png)
Support for Scripts
|
Unfortunately, scripting itself is not part of our support for the UPLINX Report Tool.
If you require help in scripting, a custom SQL command, a custom report or setting up IIS – please contact us with a requirement specification and we will provide a quote for our professional services which will be performed in our office or in a Cisco Webex session.
|
Step 5: Run as Windows Task
The Windows Task Scheduler can be started in Settings > Control Panel > Administrative Tools > Task Scheduler.
To create a new scheduled task, you can use the wizard “Create Task”, select 'webreport.bat' and specify a trigger to define the execution time(s). Select “C:\Program Files\ReportTool\webreport.bat" for the program to execute or your own script program which has been successfully tested from the command line.
|
.png)
|
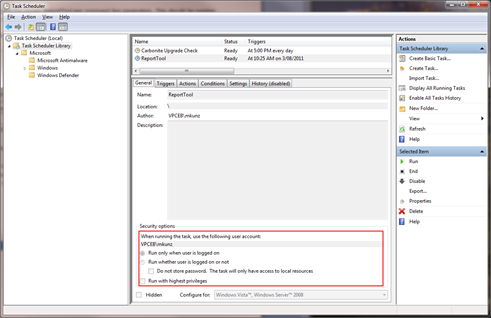
Windows Task Scheduler will execute the script in the security context of the configured user account (marked with the red box above). If there are issues when running as a scheduled task, please check the user’s security privileges and configure the user for enable interactive login.
|
|
|
Run the Windows Task under the same Account Name (user) as in interactive mode. The license is per node and per user. Hence, running it under a different user might print 'not licensed' into each 3rd record of a report.
|
|