|
When Cisco Audit Log files are added to the report comparison process, the generated comparison report will be augmented with the following information:
•Who (which user) has performed the change.
•When – the time of the change.
•Additional change details to confirm the findings of the UPLINX comparison algorithm.
Cisco Audit Logs need to be enabled first and then retrieved from the CUCM/CUC/IMP server to the Report Tool machine.
As Cisco Audit Logs from various cluster member servers are not automatically merged, they are logged on each CUCM server where the user performs updates to the Cisco CUCM configuration. In most cases, CUCM configuration changes are performed via Cisco Unified CM Administration on the publisher server but it can be also done on any subscriber. If configuration changes can be performed on any subscriber, Cisco Audit logging should be enabled on all CUCM/CUC cluster member servers and the audit logs copied to a common folder where Report Tool has access. Report Tool will merge all entries below a root path as set in the field Cisco Audit Log Folder, so the files can be simply copied into this folder.
Step 1: Enable Cisco Audit Log generation on CUCM/CUC server
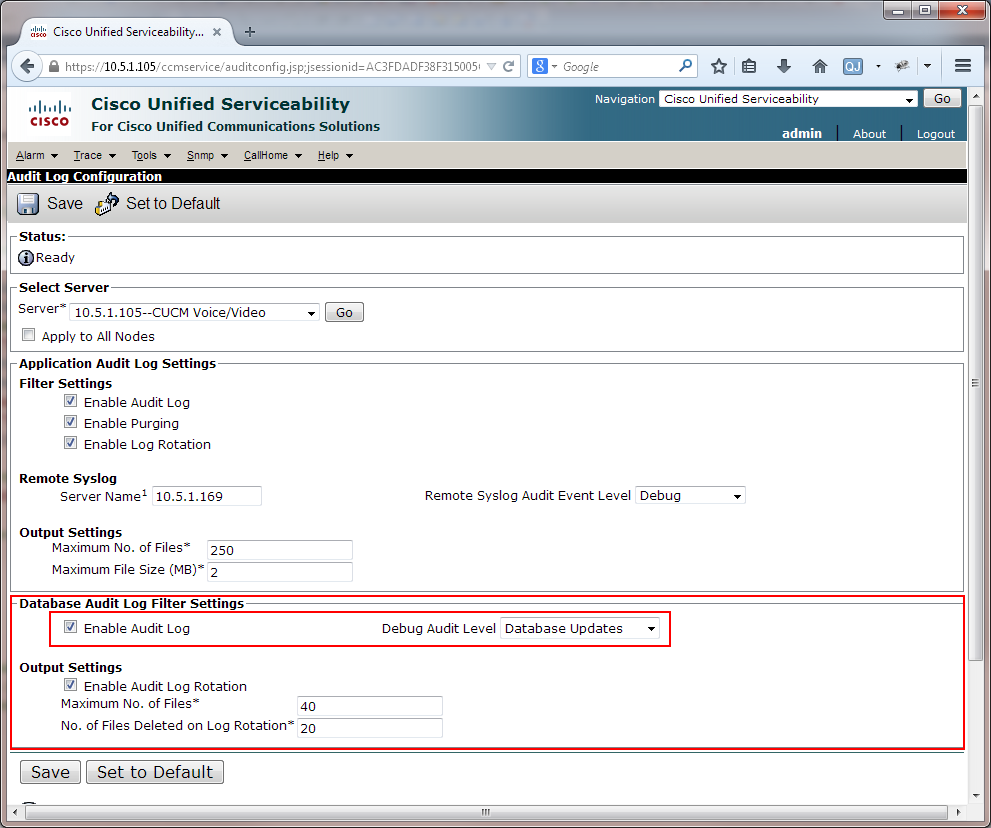
On the CUCM/CUC Administration web page, navigate to Cisco Unified Serviceability, go to Tools > Audit Log Configuration .
•Activate Enable Audit Log and set the Debug Audit Level to Database Updates in the Database Audit Log Filter Settings section.
•Activate Enable Audit Log rotation in the Output Settings.
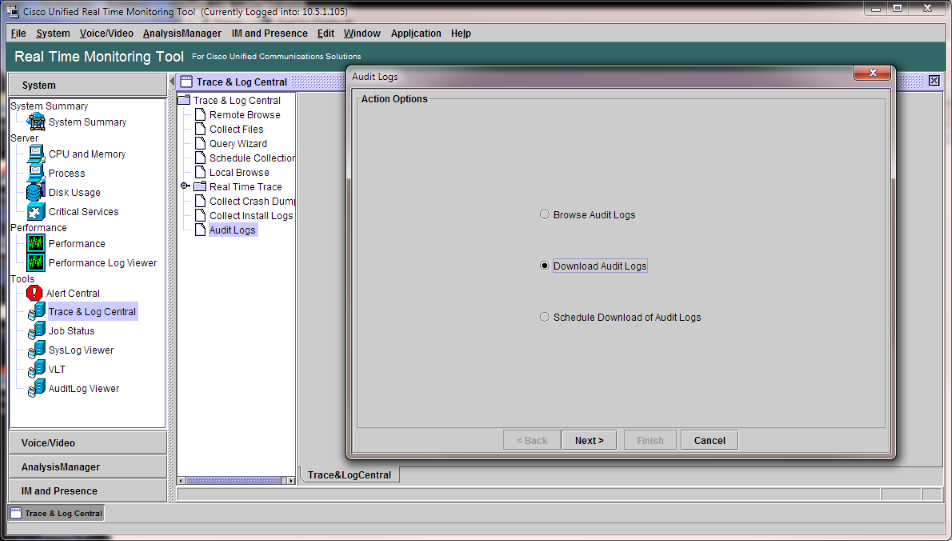
Step 2: Set up Cisco Audit Log file collection in RTMT
Audit Log files can be retrieved using Cisco Real-Time Monitoring Tool (RTMT) either manually or automatically by setting up a scheduled download.
RTMT can be downloaded for Windows and Linux from the CUCM Administration web page in Application > Plugins by searching for Cisco Unified Real-Time Monitoring Tool.
To download the Cisco Audit Logs manually, do the following:
1.Install and launch RTMT, then connect to the CUCM/CUC server;
2.Navigate to Tools > Trace & Log Central, double click on Audit Logs ;
3.Select Download Audit Logs and click the Next button;
4.In the Node Selection Options section, select the servers involved in the reported activities;
5.Select the audit log time in the Collection Time section. The time period selected, either absolute or relative, must cover the time period between the base and changed reports being compared.
6.Select the output folder as the Download File Directory in the Download File Options section. This output folder must be an exact match of the Cisco Audit Log Folder configured in the Report Tool in Step 3;
7.Click on the Finish button and wait for the file to be downloaded.
Alternatively, to set up an automatic scheduled download of the log files, do the following:
1.Install and launch RTMT, then connect to the CUCM server;
2.Navigate to Tools > Trace & Log Central, double click on Audit Logs;
3.Select Schedule Download of Audit Logs and click the Next button;
4.Select the servers involved in the reported activities in the Node Selection Options section;
5.Select the schedule time and frequency in the ScheduleTime sections, make sure that the scheduled time period covers the time period between the base and changed reports being compared;
6.Select Download Files in the Action Options section and enter the FTP server information to upload the log files. The location of the uploaded files must be an exact match of the Cisco Audit Log Folder configured in the Report Tool;
7.Click on the Finish button and the log files required for the comparison process will be available at the scheduled times.
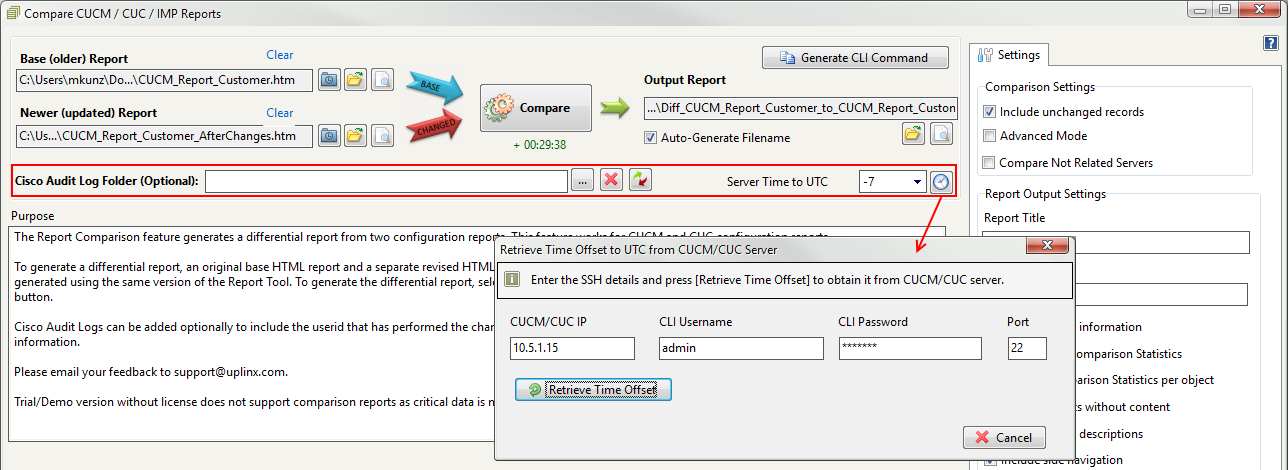
Step 3: Configure the Cisco Audit Log folder and and server time zone in Report Tool
Back in the Report Tool, set the Cisco Audit Log Folder path where the logs are located. All subfolders in this path will be searched for log files. Use the test button  to read and parse the logs for entries. to read and parse the logs for entries.
Server Time to UTC
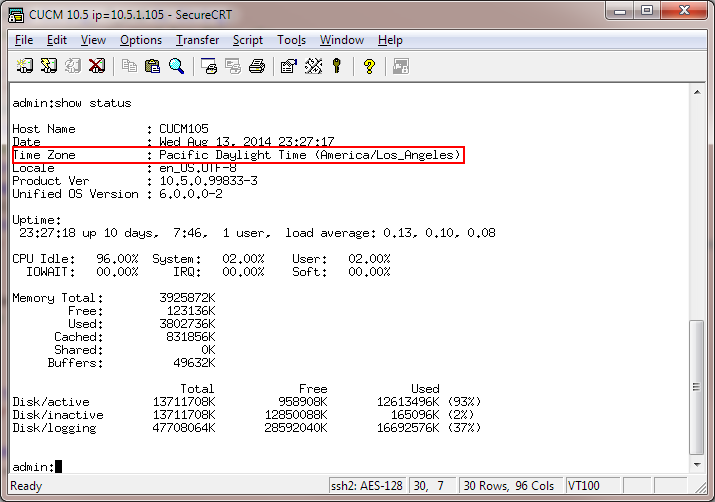
If Cisco Audit Log files are added, this must contain the time offset of the Cisco CUCM/CUC server to UTC in minutes. This can be automatically retrieved from the CUCM/CUC server by clicking on  which will start a wizard to retrieve this setting. The time zone of CUCM/CUC can be seen with the CLI command show status as per screenshot below. If there are no entries matched in the comparison, the time zone might not be correctly set. which will start a wizard to retrieve this setting. The time zone of CUCM/CUC can be seen with the CLI command show status as per screenshot below. If there are no entries matched in the comparison, the time zone might not be correctly set.
Typical time offsets are - please convert and enter in minutes, the valid range is -1440 to +1440 minutes:
•Central European Summer Time (CEST): UTC +2
•Central European Time (CET): UTC +1
•Pacific Daylight Time (PDT): UTC -7
•Pacific Standard Time (PST): UTC -8
•Mountain Daylight Time (MDT): UTC -6
•Mountain Standard Time (MST): UTC -7
•Eastern Daylight Time (EDT): UTC -4
•Eastern Standard Time (EST): UTC -5
To see the time zone on CUCM/CUC server, SSH to the server and enter the show status command:
|